In this article, we will explain about how to download Zoom app on your Mac. Zoom is a cloud based video conferencing and meeting service provider that allows to conduct virtual get to gather meetings. It is getting more popularity in pandemic duration.

How to Download Zoom on Mac?
There are two methods to download Mac app; like as:
- Download apps from Mac App Store that is easy and safe method. Here just open <App Store>, search Zoom app into <search bar>. When it is found then click on <Get> to install. After downloading Zoom, <GET> button converts into <Open>, and Click on <Open> and launch the Zoom app.
- Download Zoom from Web on your Mac, it can be little complicated from first method.
So, here you can download Zoom app from Web on Mac with using few steps; below mention all:
Getting Start Downloading Zoom on Mac
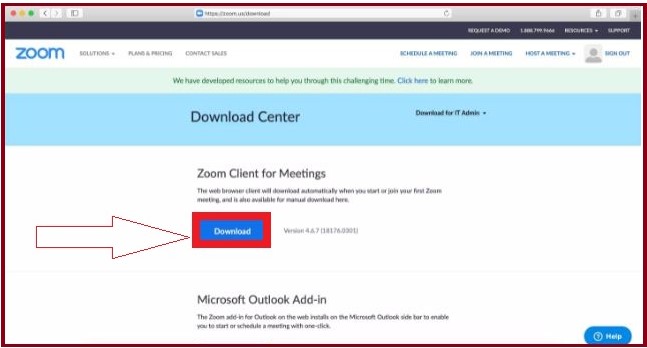
- Firstly, you have to need open Zoom Download Center on your favorite internet browser.
- Now hit the <Download> button that is showing below <Zoom Client for Meetings> in blue color.

- Then new pop-up confirming window will be open then click <Allow> if you want to allow downloads from the website.

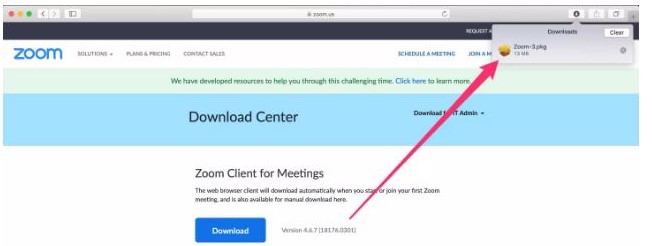
- At once, it will immediately start the download. You can cross check in your downloads spot, which is located in the top right corner on the Google Chrome and Safari.
- Now, getting to double click to open download

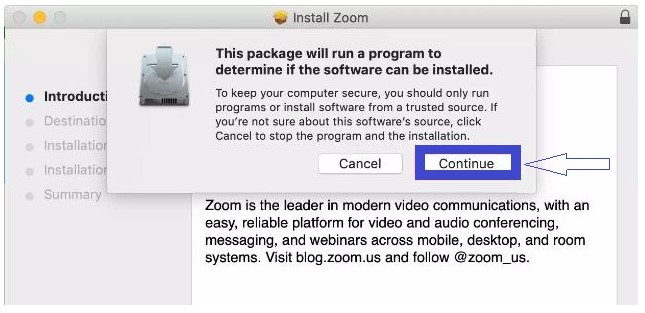
- It will help to kickstart the installation process, and click on <Continue> on the pop-up window on your system. Again click on <Continue option> if it is appeared again.

NOTE: But here you may get error message as can’t opened because this was not downloaded from App Store because your security preferences allow installation of only apps from the App Store”.
- If, this message is appeared on your screen then you have to need to change Mac’s Gatekeeper setting. Here you can follow few steps; like as:
- Hit on Apple menu
- Click option
- Click on option
- Click the General tab
- Search section and then you have to need to choose the box. Then click on and feed your admin password.
- Open file again, and just follow few instruction which are showing on your screen for completing the installation process.
- Now here Zoom’s downloading process has been completed, and you are able face to face meeting along with login screen.

How to Use Zoom on Mac?
- If you are using Zoom app on your Mac then there few concerns while using Zoom on your system; below mention all:
- Set Up a Zoom Meeting on Mac
- Adding Participants on Mac
- Joining a Zoom Meeting on Mac
- Schedule Meetings on Mac
- Getting Record Zoom Meetings on Mac
Set Up a Zoom Meeting on Mac
You can set up Zoom meeting easily with following these simple steps; below mention all:
- You have to need <Log in> your Zoom account with introducing your credentials.
- Now you get hover your mouse course over the <HOST A MEETING> option that is appearing at top right corner of your screen and you have to choose one of these options:
- With Video On
- With Video Off
- Screen Share Only
- Then this URL will be redirect you to the Zoom app and get to start a meeting. And here you have right to edit meeting settings or take copy of <Invitation URL> that you can sent to your other attendees.
Note: Now you are able to start a meeting quickly via Mac app by using few instructions.
Adding Participants on Mac
You have to need open a new meeting on the Zoom desktop app on your Mac.
- Hit on the <Invite> button that is showing in the toolbar at the bottom side.
- Then Zoom will offer you the options for <Copy URL or Copy Invitation>. You can ping these to their participants through text, email or instant messaging.
- You have also option to send directly email meeting detail via your preferred email through Zoom app itself.
Joining a Zoom Meeting on Mac
To follow all steps one by one and to join a Zoom meeting instantly:
- To Join with Using a Meeting Link
- You can join the Zoom meeting with using of <Meeting Link>. Just you have to click on this URL otherwise copy and paste it into web browser.
- To join with using a Meeting ID
- Launch the Zoom app and then press the <Join> option
- Enter the Meeting ID into box, and add your name that will be display for meeting then press the <Join> button.
Schedule Meetings on Mac
Zoom offers the “schedule” feature then you can schedule a meeting with minor setting like as:
- Date and time
- Meeting ID
- Whether it requires a password to join or not
- And more!
With following few simple steps, you can easily schedule meetings in Zoom; below mention all:
- Firstly, open the Zoom app and hit on the button <Schedule>. It like as calendar icon with blue color.
- Now new pop-up window will be open then you can feed meeting details in this pop-up.
- Note: You must be set a meeting password that helps to ignore Zoom bombing, which occurs if anyone wants to join meeting without invitation and making a disturbance.
- Once you have completed to fill all detail then press on <Schedule>button.
Getting Record Zoom Meetings
Zoom also allows you amazing feature that is to record meeting. User can use it easily as reference to document everything that was discussed. This meeting can be saved either on your local system or Zoom cloud system.
- You can record Zoom meeting with following few steps; below mention all;
- Firstly, you have to need start a meeting
- Press the <Record> option that is showing in the Zoom toolbar.
- Select the one option <Record on this Computer or Record to the Cloud> then gets to start recording.
- Hit on <Pause/Stop Recording> option to stop the recording the meeting
- When your meeting will be finished then Zoom helps to convert recording to MP4 format and save into your preferred location. Due to this, you have to get rights for accessing your recorded session any time you wish!


